
Kubernetes Unleashed: Navigating the Seas of Container Orchestration
11/2/202413 min read
Hey there, beautiful souls! 🌟 Sending out a big burst of cheer and a heartfelt Namaste! 🙏✨ Thrilled to have you with us! 🎉💖 Let's dive into this fantastic adventure together! 🚀💫
🚀✨Welcome to the world of Kubernetes, where container orchestration takes center stage in modern software development! 🌟 Whether you're a seasoned developer looking to scale applications efficiently or a beginner just dipping your toes into the vast ocean of containerization, this blog is your compass. 🧭 We'll explore the nuts and bolts of Kubernetes, demystifying complex concepts and providing you with hands-on guidance to navigate this powerful platform. 🛠️ From deploying your first pod to managing advanced multi-container applications, we'll unlock the secrets of Kubernetes together. 🔍🔓 Ready to embark on this exciting journey into the realm of container orchestration? Let's dive in! 🌊🤿✨
Agenda:
What is Kubernetes?
K8 Architecture: Master and worker nodes
Deployments and ReplicaSets
Services
Namespaces
Ingress
Persistance Volumes
Stateless and Stateful Applications in K8.
Helm Charts
What is Kubernetes?
Kubernetes, often abbreviated as K8s, is an open-source platform for automating the deployment, scaling, and management of containerized applications. Think of it as the conductor of an orchestra, where containers are the musicians playing their individual parts. It provides a framework to run distributed systems resiliently, managing the complexity so you don't have to. It's got the lot: service discovery and load balancing, storage orchestration, automated rollouts and rollbacks, and much more. Essentially, it’s the behind-the-scenes magic that keeps your application running smoothly.
Feature of Kubernetes
Scalability: Automatically scales applications up or down based on demand.
High Availability: Ensures that your applications are always running with minimal downtime.
Resource Efficiency: Optimizes the use of computing resources by efficiently managing container workloads.
Flexibility: Supports a wide range of workloads and services, allowing you to run anything from microservices to complex multi-container apps.
Self-healing: Automatically restarts failed containers, kills unhealthy ones, and reschedules them to new nodes when necessary.
Basic Concepts
Pods
In Kubernetes, a pod is the smallest, most basic deployable unit. Think of it as a single instance of a running process in your cluster. Each pod contains one or more containers (like Docker containers), which are tightly coupled and share the same network namespace, meaning they can communicate with each other over localhost. Essentially, pods encapsulate an application’s container (or multiple tightly coupled containers), storage resources, a unique network IP, and options that govern how the container(s) should run. If containers are the building blocks of applications, then pods are the building blocks of Kubernetes. They make sure your application is running smoothly and can scale appropriately.
Containers
A container in Kubernetes is a lightweight, standalone, executable package of software that includes everything needed to run it: code, runtime, system tools, libraries, and settings. Think of it as a neat, self-contained unit that can run reliably in any computing environment, making it a perfect building block for microservices. In the Kubernetes world, containers are managed within pods, ensuring they can be orchestrated effectively for deployment, scaling, and operation. Containers enable consistent environments across multiple development, testing, and production stages, removing "it works on my machine" issues. They bring agility, efficiency, and flexibility to application development and deployment.
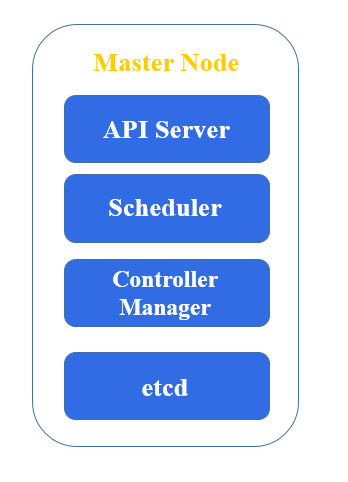
Master Node
The master node in Kubernetes, often referred to as the control plane, is responsible for managing the state of the cluster. It coordinates all the activities in your cluster, including scheduling, scaling, and management of applications. Here are the key components of the master node:
1. API Server (kube-apiserver)
Role: The front-end of the Kubernetes control plane.
Function: Exposes the Kubernetes API, processes REST requests, validates them, and updates the state of the cluster in the etcd datastore. It's the gateway through which all administrative tasks are performed.
2. etcd
Role: A consistent and highly-available key-value store used as Kubernetes’ backing store.
Function: Stores all cluster data, configuration, and state. It's the central source of truth for the cluster's state.
3. Controller Manager (kube-controller-manager)
Role: Runs controllers, which are background processes that manage the state of the cluster.
Function: Includes various controllers such as the Node Controller, Replication Controller, Endpoints Controller, and others, ensuring that the cluster's desired state is always met by performing tasks like responding to node failures, maintaining the number of replicas, and handling namespace creation and deletion.
4. Scheduler (kube-scheduler)
Role: Assigns workloads to nodes.
Function: Watches for newly created pods with no assigned node and selects an appropriate node for them to run on based on resource availability, policies, and affinity/anti-affinity specifications.
5. Cloud Controller Manager
Role: Allows the cluster to interact with the underlying cloud provider.
Function: Manages cloud-specific control loops, like managing cloud-based resources (load balancers, storage volumes), nodes in the cloud infrastructure, and ensuring the cloud provider-specific services are running as intended.
These components work in tandem to manage the state, scheduling, and control of your Kubernetes cluster, ensuring everything runs smoothly and according to the defined policies and requirements.
Deployments and ReplicaSets
Deployments and Replica Sets are two fundamental concepts in Kubernetes, acting as key players in ensuring your applications are running efficiently and reliably.
Deployments
Purpose: Manage the deployment of applications, ensuring the desired state of your application is maintained over time.
Usage: Allows you to declare the number of replicas (instances) of an application and automatically replaces any that fail.
Benefits: Supports rolling updates, enabling you to update your application seamlessly without downtime. You can also roll back to previous versions if something goes wrong.
Replica Sets
Purpose: Ensure a specified number of pod replicas are running at any given time.
Usage: Maintain a stable set of replica pods, which are consistent and reliable.
Benefits: Work with Deployments to manage scaling and rollouts. While you typically use Deployments rather than directly managing ReplicaSets, understanding Replica Sets helps you see how Kubernetes maintains application stability.
How They Work Together
Deployments create and manage Replica Sets. A Deployment specifies what a Replica Set should look like and how many replicas it should maintain. This relationship ensures your application is always running as expected. Picture Deployments as the strategic planner and Replica Sets as the hardworking crew. Together, they keep your apps running like a well-oiled machine.
How to create and manage deployments and replica sets.
Creating and managing Deployments and Replica Sets in Kubernetes is like scripting a play—once you write the script, Kubernetes ensures it’s performed correctly every time. Here’s a step-by-step guide to get you started:
Creating a Deployment
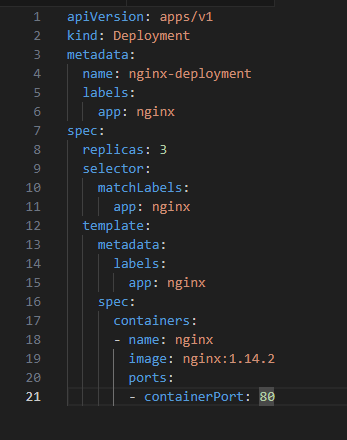
1. Define the Deployment in a YAML file:

K8 Architecture: Master and worker nodes
Components of Worker nodes
A Kubernetes (k8s) worker node is where the actual work happens. Each worker node runs the necessary components to manage containerized applications. Here's a rundown of the key components:
1. Kubelet
Role: The primary node agent that registers the node with the Kubernetes control plane. It ensures that containers are running in a pod and communicating with the master to receive tasks and report on status.
Function: Manages pod lifecycle, handles node resource management, and runs health checks.
2. Container Runtime
Role: The software responsible for running containers. Kubernetes supports several container runtimes like Docker, containerd, and CRI-O.
Function: Pulls container images, starts and stops containers, and manages container storage and networking.
3. Kube-Proxy
Role: Maintains network rules on each node. It enables communication between pods across different nodes within the cluster.
Function: Acts as a load balancer, distributing network traffic to the appropriate pods.
4. cAdvisor (Container Advisor)
Role: Provides container resource usage and performance information.
Function: Collects, aggregates, and exports resource usage and performance data from running containers. It helps in monitoring and understanding the resource usage of the applications running in the pods.
These components work together to ensure your applications are running smoothly, efficiently, and at scale in your Kubernetes cluster.

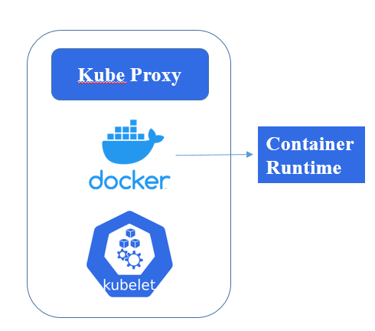
Worker Node

2. Apply the Deployment: Open your terminal and run: kubectl apply -f your-deployment-file.yaml
Managing Deployments
List deployments: kubectl get deployments
Update a Deployment: kubectl apply -f your-deployment-file.yaml
Scale a Deployment: kubectl scale deployment nginx-deployment --replicas=5 (This command scales the nginx-deployment to 5 replicas.)
Creating a ReplicaSet
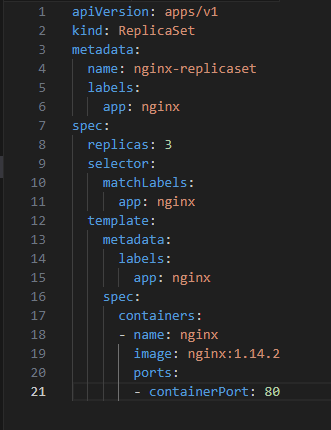
1. Define the ReplicaSet in a YAML file:

2. Apply the ReplicaSet: kubectl apply -f your-replicaset-file.yaml
Managing ReplicaSets
View ReplicaSets: kubectl get replicasets
Scale a ReplicaSet: kubectl scale replicaset nginx-replicaset --replicas=5
Services
In Kubernetes, Services are fundamental components that define how to access applications running within a set of Pods. They act as the abstraction layer that provides network access and service discovery across your application.
Role of Services
1.Stable Network Identity
Pods can be ephemeral, meaning they can be created or destroyed, causing their IP addresses to change. Services provide a consistent network endpoint (an IP address or DNS name) that remains stable even if the underlying Pods change.
2.Load Balancing
Services distribute incoming traffic across multiple Pods, ensuring high availability and scalability. This load balancing helps manage the workload and maintains a seamless user experience.
3.Service Discovery
Kubernetes Services enable other components within the cluster to discover and communicate with them. This is crucial for microservices architectures, where multiple services need to interact with one another.
Types of Services
ClusterIP (Default) : Exposes the Service on a cluster-internal IP. Only accessible within the cluster.
NodePort: Exposes the Service on a static port on each node’s IP. Accessible from outside the cluster using <NodeIP>:<NodePort>.
LoadBalancer: Provisions an external load balancer (e.g., from a cloud provider) to distribute traffic to Pods. Provides an external IP that can be accessed from outside the cluster.
ExternalName: Maps a Service to a DNS name rather than an IP, allowing you to reference external services as if they were internal.
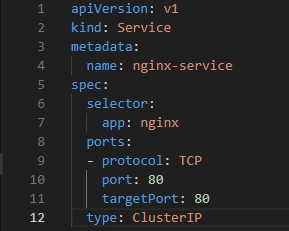
Creating a Service

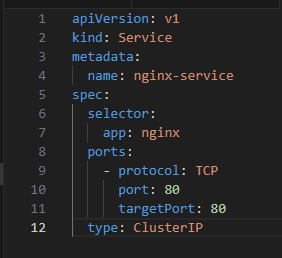
Applying the Service: kubectl apply -f nginx-service.yaml
Namespaces
In Kubernetes, a namespace is a way to divide cluster resources between multiple users (via resource quota). It's a method of virtual clustering intended to create separate environments within the same physical cluster. Think of namespaces like different project folders on your computer.
Purpose of Namespaces:
Isolation: Namespaces help isolate and organize resources, ensuring that applications don't interfere with each other.
Resource Management: By setting resource quotas, namespaces can prevent one team or project from using too many cluster resources.
Access Control: They allow for finer-grained access control using role-based access control (RBAC).
Using Namespaces:
1. Creating a Namespace: kubectl create namespace <namespace-name>
2 Deploying Resources in a Namespace: You specify the namespace when creating or managing resources:


3. Viewing Resources in a Namespace: kubectl get pods --namespace=<namespace-name>
4. Switching Between Namespaces: kubectl config set-context --current --namespace=<namespace-name>
Benefits of Using Namespaces:
Environment Separation: Different stages (development, testing, production) can be managed within the same cluster.
Team Organization: Separate resources by team or project for better management.
Efficient Resource Allocation: Apply resource quotas to ensure fair usage.
Namespaces bring order and structure to your Kubernetes cluster, making it easier to manage complex environments and multiple teams.
Ingress
In Kubernetes, an Ingress is an API object that manages external access to services within a cluster, typically HTTP. It provides a way to configure rules for routing external traffic to the appropriate services, like a traffic cop directing vehicles to the correct destination.
Purpose and Benefits:
External Access: Allows you to expose HTTP and HTTPS routes from outside the cluster to services within it.
Load Balancing: Provides load balancing for HTTP/HTTPS traffic, distributing incoming requests across multiple services or pods.
SSL Termination: Handles SSL/TLS termination, providing a single point where you can manage certificates.
Path-Based Routing: Directs traffic based on URL paths. For example, example.com/api can route to one service, while example.com/web routes to another.
Components of an Ingress:
Ingress Controller: The component that reads the Ingress Resource information and processes the data accordingly.
Ingress Resource: The YAML configuration that defines how to route traffic.
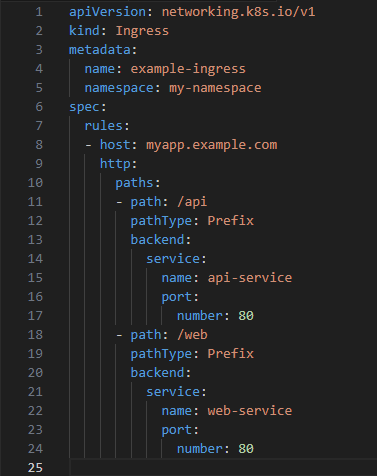
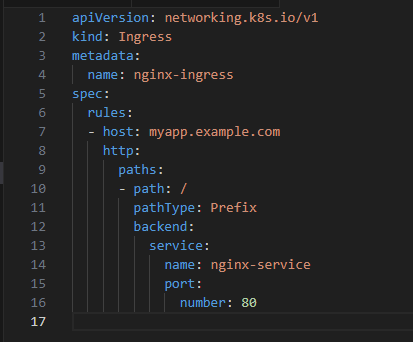
Example of an Ingress Resource:
Here’s a simple YAML configuration for an Ingress Resource:

Applying the Ingress: kubectl apply -f example-ingress.yaml
{Save the YAML file (e.g., example-ingress.yaml) and apply it using}
Why Use Ingress:
Simplified Access: Instead of exposing each service individually, you can use a single Ingress to manage access.
Flexibility: Easily route traffic to different services based on rules, making it highly adaptable to your architecture’s needs.
Security: Centralize SSL/TLS termination and reduce the attack surface.
Ingress makes managing and routing external traffic to your Kubernetes services seamless and efficient.
Configuring ingress to expose applications to the internet
Alright, let’s dive into configuring an Ingress in Kubernetes to expose your applications to the internet.
Step-by-Step Guide: Configuring Ingress
1. Install an Ingress Controller
First, you need an Ingress Controller in your cluster, which handles the routing of external traffic based on your Ingress resources. There are various Ingress Controllers like Nginx, HAProxy, and Traefik. For this example, let's use the Nginx Ingress Controller.
cmd = kubectl apply -f https://samplegithubuser.com/kubernetes/ingress-nginx/main/deploy/static/provider/cloud/deploy.yaml
2. Create Your Services
Ensure your application services are set up. Here's a simple example for an Nginx service:

3. Define Your Ingress Resource
Create an Ingress resource to define the routing rules. Save the following YAML to a file, e.g., nginx-ingress.yaml:
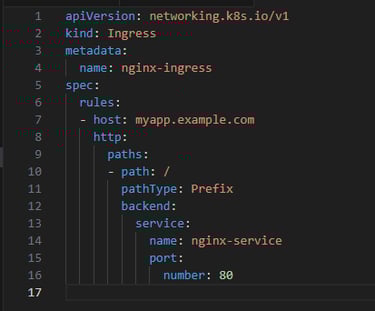
4. Apply the Ingress Resource: kubectl apply -f nginx-ingress.yaml
5. Update DNS:
Ensure that your DNS points to the external IP of your Ingress Controller. You can find the IP address by running:
kubectl get services -o wide -w --namespace ingress-nginx
Update your DNS provider to direct traffic from myapp.example.com to the external IP obtained from the command above.
6. Verify the Setup
Test your setup by navigating to your domain (myapp.example.com). If configured correctly, you should see your application running.
Bonus Tips:
TLS/SSL: For secure access, configure TLS termination. Add the tls section in your Ingress resource and create a secret for your certificates.
Advanced Routing: Utilize path-based or host-based routing to direct traffic to different services.
This configuration should get your applications exposed to the internet via Ingress in Kubernetes.
Persistent Volumes
A Persistent Volume (PV) in Kubernetes is a storage resource in the cluster that provides storage independent of the lifecycle of a pod. Think of it like a USB drive that stays connected to your computer, no matter how many times you restart it.
Key Features:
Decoupling Storage: Persistent Volumes decouple storage from the pod, allowing data to persist even if the pod is deleted or recreated.
Storage Classes: PVs support different types of storage systems like NFS, iSCSI, local storage, cloud storage, etc., which can be defined using Storage Classes.
Lifecycle Management: PVs have their own lifecycle and can be retained, deleted, or recycled after they’re released by a pod.
How it Works:
PersistentVolume (PV): A cluster-wide pool of storage resources, created and managed by administrators.
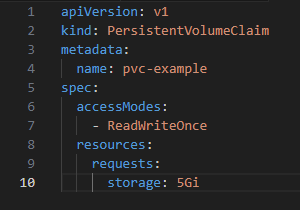
PersistentVolumeClaim (PVC): A request for storage by a user, defining the size and access mode (ReadWriteOnce, ReadOnlyMany, etc.).
Binding: When a PVC is created, Kubernetes finds a matching PV and binds them together.
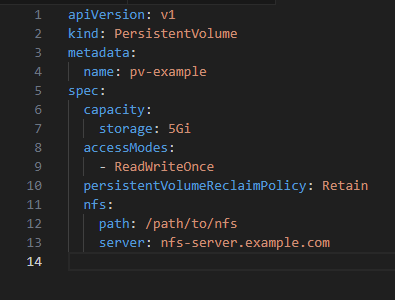
Define a Persistent Volume (PV):

Define a Persistent Volume Claim (PVC):

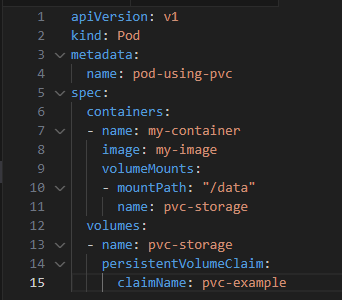
Binding PV and PVC: Kubernetes automatically matches and binds the PVC to an appropriate PV. Using PVC in a Pod:

Persistent Volumes ensure that your data is safe and available even when pods come and go.
Stateless and Stateful Applications in K8.
In Kubernetes (K8s), applications can be categorized as stateful or stateless based on how they manage data and state. Here’s a breakdown of each:
Stateless Applications
Stateless applications do not store any client session data on the server. Each request from a client is treated independently, and the application doesn’t need to remember any previous interactions.
Characteristics:
Scalability: Easier to scale horizontally since any instance can handle any request.
Load Balancing: Requests can be routed to any instance without concern for session data.
Resilience: If an instance fails, other instances can continue to operate without losing state.
Stateful Applications
Stateful applications maintain state across sessions. They store client session data and keep track of the user’s interactions or application data.
Characteristics:
Data Persistence: Must manage and persist data, often using databases or storage volumes.
Scaling Complexity: More complex to scale since instances may need to share or replicate state data.
Pod Identity: Stateful applications often require consistent network identities and storage, which can be managed using StatefulSets in K8s.
Kubernetes Support
Stateless: Typically managed using Deployments, which allow for easy scaling and updates.
Stateful: Managed using StatefulSets, which provide guarantees about the ordering and uniqueness of pod deployment and scaling, as well as persistent storage through PersistentVolumeClaims.
Helm Charts
A Helm Chart is a collection of files that describe a related set of Kubernetes resources. Essentially, it's like a package manager for Kubernetes, streamlining the deployment and management of applications.
Key Components of a Helm Chart:
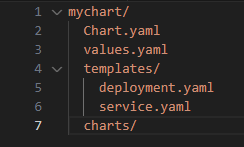
Chart.yaml: Contains metadata about the chart (name, version, description).
values.yaml: Default configuration values for the chart. You can override these defaults with your own values.
templates/: Directory containing Kubernetes resource templates (e.g., Deployments, Services).
charts/: Directory for chart dependencies.
Benefits of Using Helm Charts:
Simplification: Helm Charts bundle all required components and configurations, making deployments repeatable and manageable.
Versioning: Charts can be versioned, enabling easy rollbacks and upgrades.
Configurability: Override default values to customize deployments without modifying the original chart.
Reuse: Share and reuse charts across different projects and teams.
Example Helm Chart Structure:

Conclusion:
🌟🚀As we wrap up our exploration of Kubernetes, it's clear that this powerful platform is revolutionizing the way we manage containerized applications. From deploying your first pod to mastering advanced configurations, Kubernetes provides the tools and flexibility needed for modern software development. 🚀🛠️✨
Embracing Kubernetes means stepping into a world where scalability, efficiency, and resilience are at your fingertips. 🌐💪 Whether you're a beginner taking your first steps or an experienced developer seeking to refine your skills, remember that the journey of mastering Kubernetes is both challenging and rewarding. 🚀🌈💡 Keep experimenting, learning, and innovating. 🎓🔍✨
Thank you for joining me on this exciting journey through the world of Kubernetes. 🌟🚀✨ Together, we've explored the fundamentals, dived into advanced concepts, and unlocked the true potential of container orchestration. Your curiosity and enthusiasm made this adventure truly enjoyable and inspiring. 😃💡
As you continue to experiment and learn, remember that each step brings you closer to mastering Kubernetes. 💪📚 Keep pushing the boundaries and embracing the possibilities. 🌈🚀