
GitLab CI/CD: Deploy Python Web App to AWS with Ease
3/2/20258 min read
A warm hello and heartfelt Namaste to all of you! 🌟😊🙏 I’m so grateful to connect with such an inspiring community. Your presence here is truly appreciated, and I’m excited to share this moment together! 💖✨ Let’s spread love, light, and positive vibes everywhere! 🌍💫💖🌸🌞
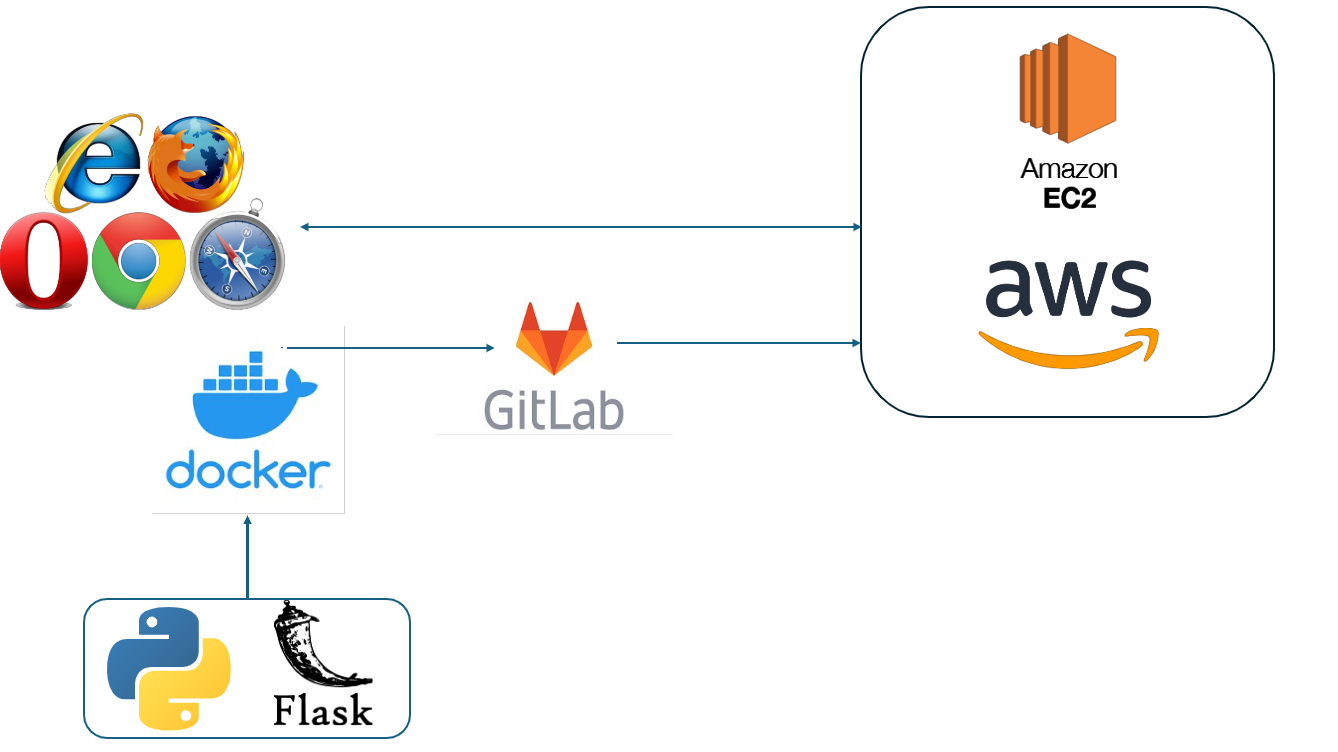
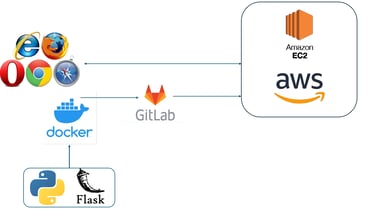
Deploying a Python web application to the cloud can be a game-changer, and automating that deployment with GitLab CI/CD makes the process even more efficient. In this blog, we'll guide you through deploying a Python web app to an AWS EC2 instance using GitLab's Continuous Integration and Continuous Deployment (CI/CD) pipeline. By the end, you'll have a fully automated deployment process that can save you time, reduce errors, and streamline your workflow. Whether you're new to GitLab CI/CD or AWS, this step-by-step guide will help you set up everything you need to get your app running smoothly in the cloud. Let’s get started!
You can find the code for this project on my GitHub here. I also made a hands-on tutorial on YouTube, which you can watch here.
Project Overview
The goal of this blog post is to provide a comprehensive, step-by-step guide for deploying a Python web application to an AWS EC2 instance using GitLab CI/CD. The tutorial aims to help developers automate their deployment process, streamline their workflows, and enhance productivity by leveraging the power of GitLab's continuous integration and deployment tools.
Let’s dive into the following steps:
Step 1: Creating the Python Application
Here’s the Python code for app.py:
from flask import Flask, render_template
import os
#Flask App Initialization
app = Flask(__name__, template_folder='templates')
#Defining the Route for the Home Page
@app.route('/')
def index():
return render_template(template_name_or_list='index.html')
#Running the App
if name == "__main__":
app.run(host="0.0.0.0",port=5000,debug=True)
Explanation:
#Flask App Initialization: Initializes the Flask app, specifying the templates folder.
#Defining the Route for the Home Page: This defines the route for the home page (/), which renders the index.html template when accessed.
#Running the App: This runs the Flask app on all network interfaces (0.0.0.0) at port 5000, with debugging enabled for development.
Head to GitHub for complete source code including html and CSS used for UI.
Writing test for above app.py
Here’s the Python code for testApp.py:
import unittest
from src.app import app
class FlaskAppTestCase(unittest.TestCase):
# Set up a test client for the Flask app
def setUp(self):
self.app = app.test_client()
self.app.testing = True
# Test the '/' route to ensure it returns a 200 status code
def test_index_route(self):
response = self.app.get('/')
self.assertEqual(response.status_code, 200)
# Test the response content to ensure "Hello From Python!" is in the HTML output
def test_index_content(self):
response = self.app.get('/')
self.assertIn(b"Hello From Python!", response.data) # Make sure it contains "Hello From Python!"
if name == "__main__":
unittest.main()
Step 2: Writing requirements.txt
Here's the code:
click==8.0.3
colorama==0.4.4
dnspython==2.7.0
Flask==2.0.2
itsdangerous==2.0.1
Jinja2==3.0.3
MarkupSafe==2.0.1
Werkzeug==2.0.2
This installs the Python dependencies specified in the requirements.txt file. This allows you to install any libraries that your Python application needs to run.
Step 3: Writing a Dockerfile
Now, we need to containerize our Python application using Docker. A Dockerfile defines the steps required to build a Docker image for our app.
Here’s the Dockerfile for the app:
FROM python:3.10.0-alpine3.15
EXPOSE 80
WORKDIR /app
COPY requirements.txt .
RUN pip install -r requirements.txt
COPY src src
ENTRYPOINT ["python", "./src/app.py"]
Explanation:
FROM python:3.10.0-alpine3.15 : We start with a Python image
EXPOSE 80: Exposes port 80 so the app can be accessed externally.
WORKDIR /app: This sets the working directory inside the container.
COPY requirements.txt requirements.txt : This copies the requirements.txt file from the host machine (the machine where you're building the Docker image) into the container at the path /code/requirements.txt.
RUN pip install -r requirements.txt : This installs the Python dependencies specified in the requirements.txt file using pip. This allows you to install any libraries that your Python application needs to run.
ENTRYPOINT["python", "./src/app.py"] : This sets the default command that will be run when the container is started. In this case, it will run python app.py, which means it will start the Python application by executing app.py.
Step 4: Writing .gitlab-ci.yaml
#Defining Variables
variables:
IMAGE_NAME: shivamrana28/hellopy
IMAGE_TAG: 5.0.1
#Defining Stages
stages:
- test
- upload-to-docker
- deploy-to-aws
#The runTests Job (Testing the Code)
runTests:
stage: test
image: python:3.10.0-alpine3.15
before_script:
- chmod 777 -R tests
- pip install flask
script:
- echo "Running unit tests..."
- python -m unittest discover -s tests -p "testApp.py"
#The build Job (Building and Uploading Docker Image)
build:
stage: upload-to-docker
image: docker:28.0.0-rc.1-cli
services:
- docker:28.0.0-rc.1-dind
variables:
DOCKER_TLS_CERTDIR: "/certs"
before_script:
- docker login -u $DOCKER_USER -p $DOCKER_PASSWORD
script:
- docker build -t $IMAGE_NAME:$IMAGE_TAG .
- docker push $IMAGE_NAME:$IMAGE_TAG
# The deploy Job (Deploying to AWS)
deploy:
stage: deploy-to-aws
before_script:
- chmod 400 $AWS_SSH_KEY
- apt-get update && apt-get -y install sudo
- sudo apt-get install snapd && sudo snap install notes
- sudo apt-get update
script:
- ssh -o StrictHostKeyChecking=no -i $AWS_SSH_KEY ubuntu@ec2-54-144-79-231.compute-1.amazonaws.com "
docker login -u $DOCKER_USER -p $DOCKER_PASSWORD &&
docker run -d -p 80:5000 $IMAGE_NAME:$IMAGE_TAG"
Explanation:
#Defining Variables
variables: This section defines global variables that will be used throughout the pipeline.
IMAGE_NAME: Specifies the name of the Docker image (shivamrana28/hellopy).
IMAGE_TAG: Defines the tag for the Docker image (5.0.1).
#Defining Stages
stages:: This section defines the sequence of stages in the pipeline.
test: First stage, runs unit tests on the code.
upload-to-docker: Second stage, builds and uploads the Docker image to a Docker registry.
deploy-to-aws: Final stage, deploys the application to AWS EC2.
#The runTests Job (Testing the Code)
runTests:: Defines a job named runTests that belongs to the test stage.
stage: test: The job is part of the test stage.
image: python:3.10.0-alpine3.15: Specifies the Docker image to use for this job. It uses a lightweight Python 3.10 image based on Alpine Linux.
before_script:: These commands are run before the main script.
chmod 777 -R tests: Changes the permissions of the tests directory to allow all users to read, write, and execute.
pip install flask: Installs Flask in the environment for testing.
script:: The main commands to run for this job.
echo "Running unit tests...": Prints a message indicating that unit tests are being executed.
python -m unittest discover -s tests -p "testApp.py": Runs unit tests using Python's unittest framework, looking for files named testApp.py in the tests directory.
#The build Job (Building and Uploading Docker Image)
build:: Defines a job named build that belongs to the upload-to-docker stage.
stage: upload-to-docker: The job is part of the upload-to-docker stage.
image: docker:28.0.0-rc.1-cli: Uses the Docker CLI image to run Docker commands.
services:: Specifies additional Docker services.
docker:28.0.0-rc.1-dind: Uses Docker-in-Docker to enable Docker commands within the pipeline.
variables:: Defines variables for the job.
DOCKER_TLS_CERTDIR: "/certs": Sets up the TLS certificates directory for Docker.
before_script:: Commands to run before the main script.
docker login -u $DOCKER_USER -p $DOCKER_PASSWORD: Logs into Docker Hub using the provided credentials.
script:: Main commands to run for this job.
docker build -t $IMAGE_NAME:$IMAGE_TAG .: Builds a Docker image with the specified name and tag.
docker push $IMAGE_NAME:$IMAGE_TAG: Pushes the built Docker image to the Docker registry.
# The deploy Job (Deploying to AWS)
deploy:: Defines a job named deploy that belongs to the deploy-to-aws stage.
stage: deploy-to-aws: The job is part of the deploy-to-aws stage.
before_script:: Commands to run before the main script.
chmod 400 $AWS_SSH_KEY: Changes the permissions of the AWS SSH private key to be read-only for the owner.
apt-get update && apt-get -y install sudo: Updates package lists and installs sudo.
sudo apt-get install snapd && sudo snap install notes: Installs snapd and the notes package (seems unrelated to deployment).
sudo apt-get update: Updates the package lists again.
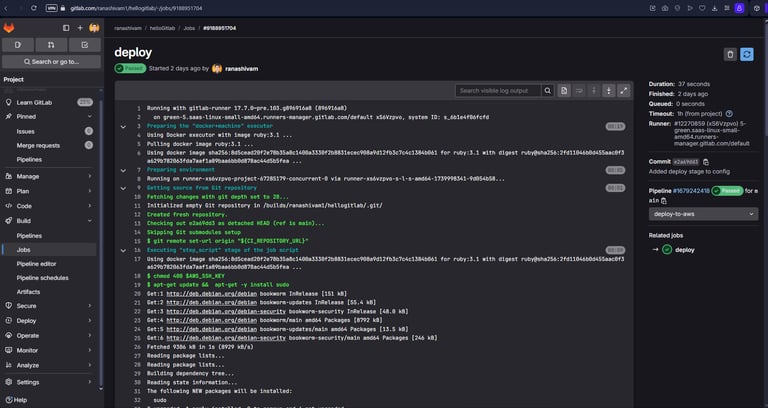
script:: Main commands to run for this job.
ssh -o StrictHostKeyChecking=no -i $AWS_SSH_KEY ubuntu@ec2-54-144-79-231.compute-1.amazonaws.com: SSHs into the EC2 instance using the SSH key $AWS_SSH_KEY.
docker login -u $DOCKER_USER -p $DOCKER_PASSWORD: Logs into Docker on the EC2 instance using Docker credentials. DOCKER_USER & DOCKER_PASSWORD is defined in Step 6.1
docker run -d -p 80:5000 $IMAGE_NAME:$IMAGE_TAG: Runs the Docker container in detached mode, exposing port 5000 inside the container to port 80 on the EC2 instance.
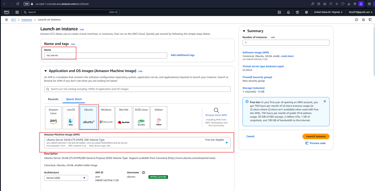
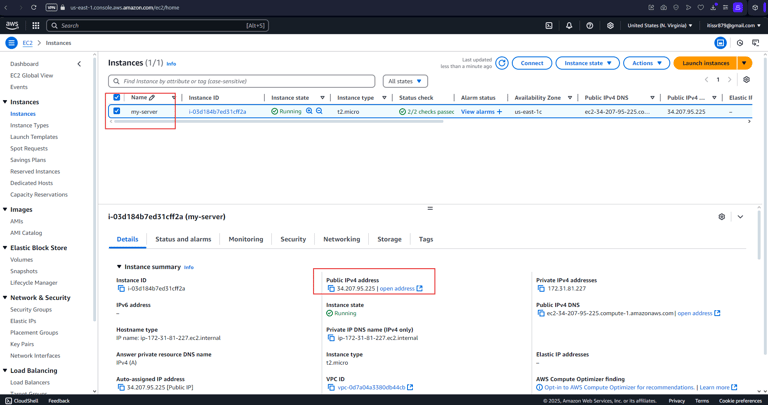
Step 5: Launching AWS EC2 Instance
Go to the AWS Console and log in.
Launch EC2 Instance
In the EC2 Dashboard, click Launch Instance.
Select Ubuntu Server 20.04 LTS (or latest).
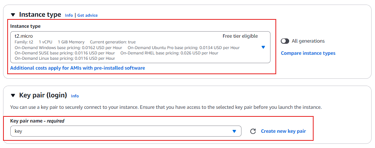
Select t2.micro (Free tier eligible)
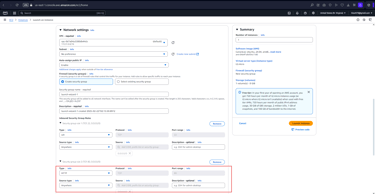
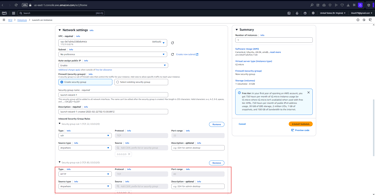
Under Networking section, Create a new security group, Add HTTP rule: 0.0.0.0/0 for Source = Anywhere.
Click Review and Launch.
Select or create a key pair, acknowledge the key, and click Launch Instances.
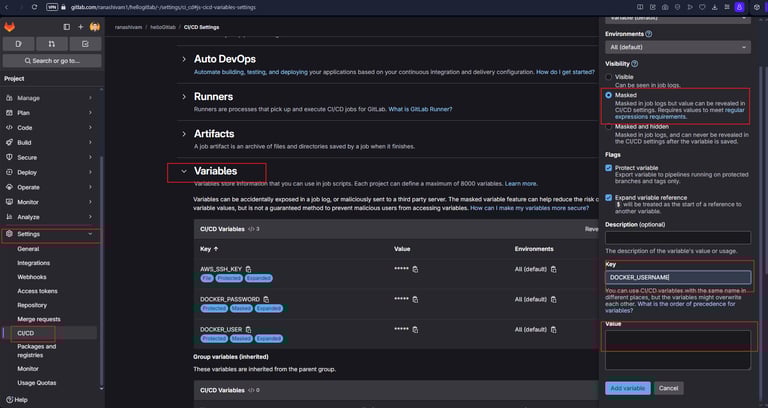
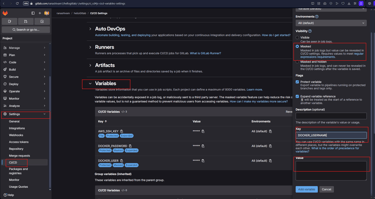

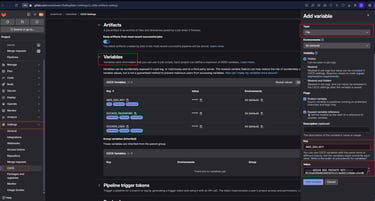
Step 7: Login to Gitlab
Goto the project repository, click on settings --> CI/CD --> Variables --> Add variables
Select type = variable (default) , visibility = Masked, Key = DOCKER_USER, Value = <your-docker-hub-username>
Select type = variable (default) , visibility = Masked, Key = DOCKER_PASSWORD, Value = <your-docker-hub-password>
Select type = file , Key = AWS_SSH_KEY, Value = key.pem used to launch AWS EC2 instance in Step 5
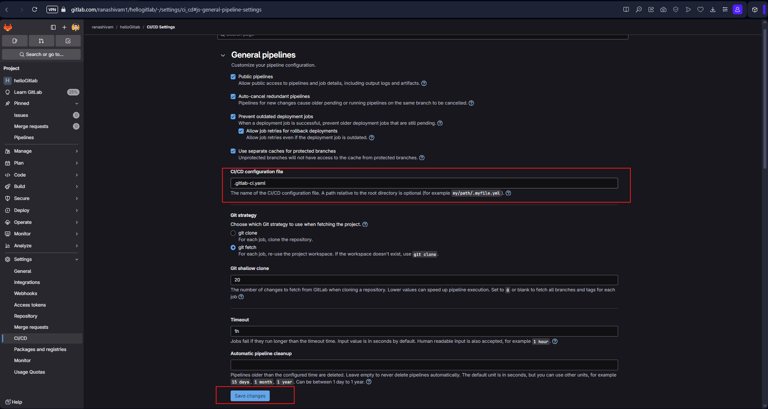
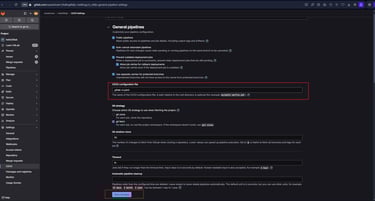
Goto the project repository, click on settings --> CI/CD --> General Pipelines
Add .gitlab-ci.yaml file to CI/CD configuration file and click on save changes.
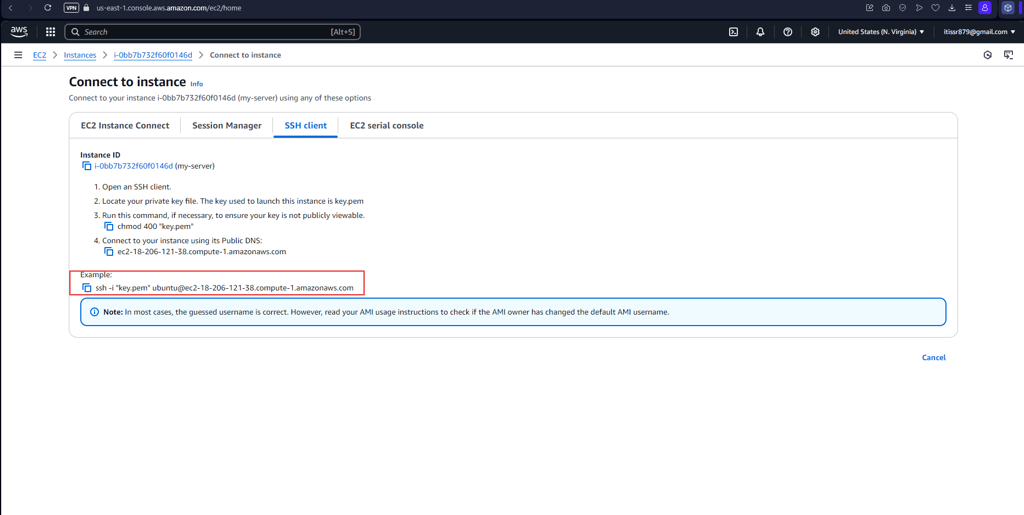
Step 6: Login to AWS EC2
Login to the Ec2 server using ssh command ssh -i "key.pem" ubuntu@ec2-12-206-121-38.compute-1.amazonaws.com
Run below command to install dependencies for our deployments
apt-get update && apt-get -y install sudo
sudo apt-get install snapd && sudo snap install notes
sudo apt-get update
sudo apt install docker.io
sudo chmod 777 /var/run/docker.sock
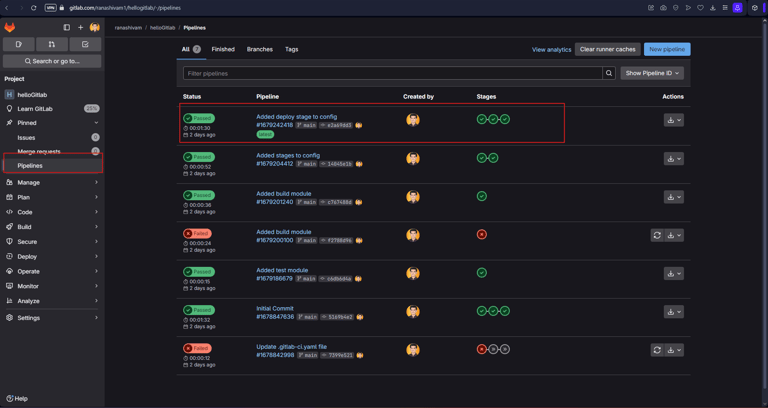
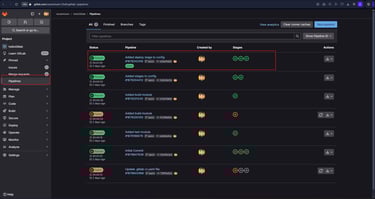
Step 8: Running Pipeline
Push your code to Gitlab and your pipeline will be triggered automatically.
Click on pipeline module to check logs

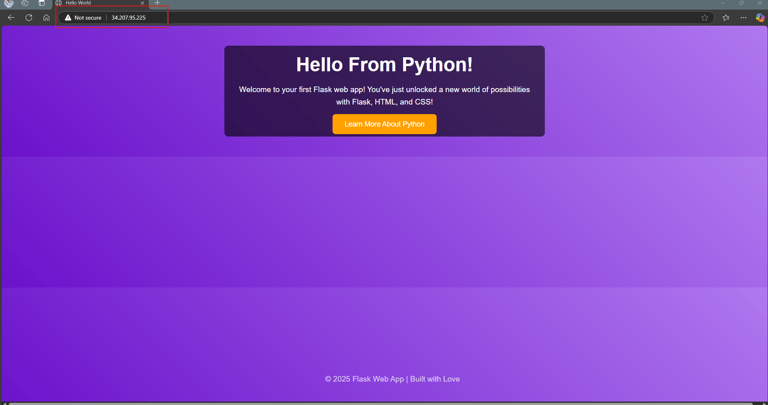
Step 9: Accessing website via browser
Login to AWS host using using ssh command ssh -i "key.pem" ubuntu@ec2-12-206-121-38.compute-1.amazonaws.com
To check the successful deployment of docker image, run command = sudo docker ps (check image below)
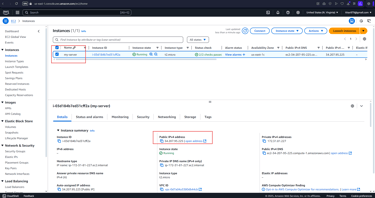
Grab the public Ip v4 address (34.207.95.225) of the AWS EC2 and paste it in browser and the website should be accessible.
If your website is not accessible, use http instead of https i.e. try http://<public-ip-v4-address>
Conclusion
In conclusion, automating your Python web application deployment to AWS using GitLab CI/CD not only enhances efficiency but also ensures consistency and reliability in your development workflow. By following the steps outlined in this guide, you've set yourself up with a robust, automated deployment pipeline that can be easily maintained and scaled. As you continue to grow your app, GitLab CI/CD will allow you to deploy faster, reduce manual errors, and focus more on development rather than deployment. Happy coding, and welcome to a more streamlined cloud deployment experience!
If you're interested in exploring the code further, feel free to check out my GitHub repository here. I've also put together a detailed, step-by-step tutorial on YouTube that guides you through the entire process—watch it here. Happy coding, and don't hesitate to leave any questions or feedback!
Thank you for joining me on this exciting journey through deploying Python web apps with GitLab CI/CD to AWS! 🌟🚀✨ Together, we’ve covered the essentials, tackled more advanced concepts, and unlocked the power of automating deployments with ease. Your enthusiasm and drive have made this experience both enjoyable and inspiring. 😃💡
As you continue experimenting and refining your deployment pipeline, remember that each step brings you closer to mastering GitLab CI/CD and AWS. 💪📚 Keep pushing forward, experimenting, and embracing new possibilities. 🌈🚀
Until next time, happy deploying! 🎉🎊✨